As you know, Xamarin.Forms (and now .NET MAUI) allows us to create cross-platform mobile apps. However, one of the biggest challenges with these technologies is knowing how to customize your Controls and UI.
In this blog, we are going to explore some awesome libraries to add cool drop shadow effects to our projects.
Xamarin Community Toolkit’s ShadowEffect
In a previous blog, we used the Xamarin Community Toolkit to build Awesome Mobile Forms. Now, let’s use its ShadowEffects to customize the look of Labels and Frames.
1. Let’s start by adding Xamarin.CommunityToolkit in our project as a NuGet package.

2. Let’s add Xamarin.CommunityToolkit in our ContentPage.

3. That’s all. Let’s use it.
We can add the effect by adding xct:ShadowEffect.
We’ll set the following properties on XAML:
- Color: is the shadow color.
- Opacity: controls the opacity of the shadow.
- Radius: controls the blurring.
- OffsetX/OffsetY: specified the horizontal or vertical displacement.
<Label HorizontalOptions="Center"
       VerticalOptions="Center"
       Text="Shadows with Xamarin Toolkit"
       FontSize="18"
       xct:ShadowEffect.Color="Red"
       xct:ShadowEffect.OffsetX="5"
       xct:ShadowEffect.OffsetY="5"
       xct:ShadowEffect.Radius="2"
       xct:ShadowEffect.Opacity="0.8"/>

<Frame HasShadow="True"
       CornerRadius="10"
       WidthRequest="80"
       BackgroundColor="White"
       Padding="10"
       HorizontalOptions="Center"
       VerticalOptions="Center"
       IsClippedToBounds="True"
       xct:ShadowEffect.Color="Red"
       xct:ShadowEffect.Radius="5"
       xct:ShadowEffect.Opacity="1"
       Margin="10">
    <Image Source="full_trailhead_logo.png" WidthRequest="80" />
</Frame>
Sharpnado.Shadows
Sharpnado.Shadows is a third-party library that helps us add shadows easily.
1. Let’s start by adding Sharpnado.Shadows in our project as a NuGet package.

2. Let’s add an Initialize in AppDelegate.cs on the iOS project.
public override bool FinishedLaunching(UIApplication app, NSDictionary options)
{
    global::Xamarin.Forms.Forms.Init();
    Sharpnado.Shades.iOS.iOSShadowsRenderer.Initialize();
    LoadApplication(new App())
    return base.FinishedLaunching(app, options);
}
3. Let’s add Sharpnado.Shades in our ContentPage.

4. Let’s use it by setting the following properties:
- Color: is the shadow color.
- Opacity: controls the opacity of the shadow.
- BlurRadius: controls the blurring.
- Offset: specified the horizontal or vertical displacement.
- CornerRadius: specified the size of the rounded corners of the shadow.
- ImmutableShades: allows us to add more than one Shades.
We can define a SingleShade:
<sh:Shadows Margin="0,0,0,5"
            Shades="{sh:SingleShade Offset='2,5',
                                    Opacity=0.4,
                                    BlurRadius=3,
                                    Color=#00B0FB}"
            CornerRadius="10">
    <Label Text="Shadows with a Single Sharpnado.Shadows" FontSize="18" HorizontalOptions="Center"/>
</sh:Shadows>
or multiple shadows at one:
<sh:Shadows CornerRadius="10" Margin="0,10,0,0">
    <sh:Shadows.Shades>
        <sh:ImmutableShades>
            <sh:Shade BlurRadius="10"
                      Opacity="0.5"
                      Offset="10,10"
                      Color="#0076AE" />
            <sh:Shade BlurRadius="10"
                      Opacity="0.5"
                      Offset="-10,-10"
                      Color="Orange" />
        </sh:ImmutableShades>
    </sh:Shadows.Shades>
    <Frame WidthRequest="80"
           Padding="10"
           HorizontalOptions="Center"
           VerticalOptions="Center"
           BackgroundColor="White"
           CornerRadius="10">
        <Image Source="full_trailhead_logo.png" WidthRequest="80" />
    </Frame>
</sh:Shadows>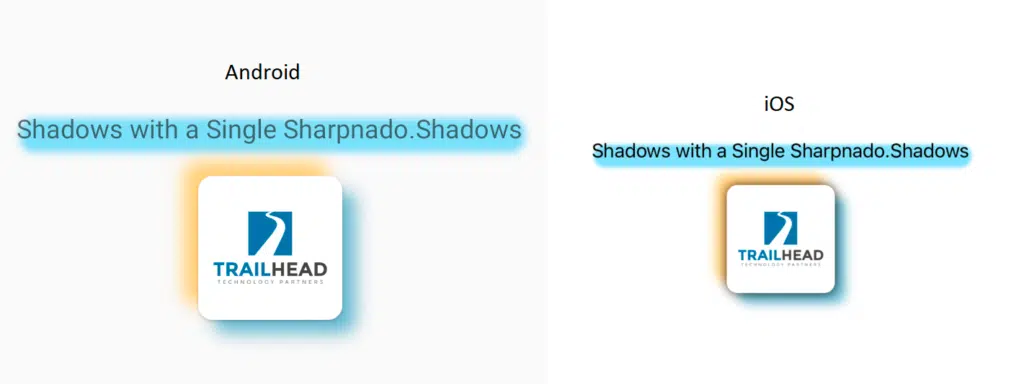
A Note on .NET MAUI
The Xamarin Community Toolkit is available to use with .NET MAUI. However, it throws an exception if you try to use a ShadowEffect:
No service for type 'Microsoft.Maui.Controls.Hosting.EffectsFactory' has been registered.Unfortunately, there also is no current version of the Sharpnado.Shadows library available for .NET MAUI. But don’t worry, the Microsoft team has released a built-in Shadow class that we can use instead.
See my example of using it below setting the following properties:
Radius: controls the blurring.Opacity: controls the opacity of the shadow.Brush: represents the brush used to colorize the shadow.OffSet: specified the horizontal or vertical displacement.
<Image
    Source="full_trailhead_logo.png"
    SemanticProperties.Description="Trailhead logo"
    HeightRequest="200"
    HorizontalOptions="Center" >
    <Image.Shadow>
        <Shadow Brush="Black"
                Offset="20,20"
                Radius="40"
                Opacity="0.8" />
    </Image.Shadow>
</Image>
Conclusion
That’s all. The code is available on GitHub for you to review. Happy coding!