Many years ago I was working on a wind turbine app and had to create a gauge control for it. I was searching for any available library that would do the job for me. It was the first custom control project of my life with no prior experience of the platform. One of the biggest things that bothered me at that time was infinite cycle of “change-run-check” procedures while tuning the component.
Today I want to show you how we can simplify and accelerate the development process for custom controls. As an inspiration I took Glenn Stephens Xamarin Forms gauge sample and the CodeAndMagic android gauge control, which I have ported from java/Android to C#/Xamarin.Android. I decided to combine them and create something “in the middle” :). The full source for the gauge control is on GitHub at yurkinh/XFGauge.
Creating & Configuring the Project
Create a blank Xamarin.Forms project and add the SkiaSharp.Views.Forms nuget package to all of your projects.
Making up the Control
The article assumes that you are somewhat familiar with SkiaSharp and Xamarin.Forms custom controls.
Documentation:
SkiaSharp Library
SkiaSharp Documentation
The control is basically made up of a Canvas View (SKCanvasView), the OnPaintSurfaceMethod and Bindable Properties.

Now we need to add parts of our future control which we will place in the OnPaintSurfaceMethod. The Main building blocks are:
SKPaint is used to defining styling for our graphic to be drawn.
SKRect defines our rectangle with coordinates (X1,Y1) (X2,Y2).
SKPath is used to draw a graphic along a path.
Generally you would need to make lot of cycles of “change-run-check” (on any of the XF platforms: iOS, Android, UWP ) while creating and tuning the control. “But not today” © (Family Guy)

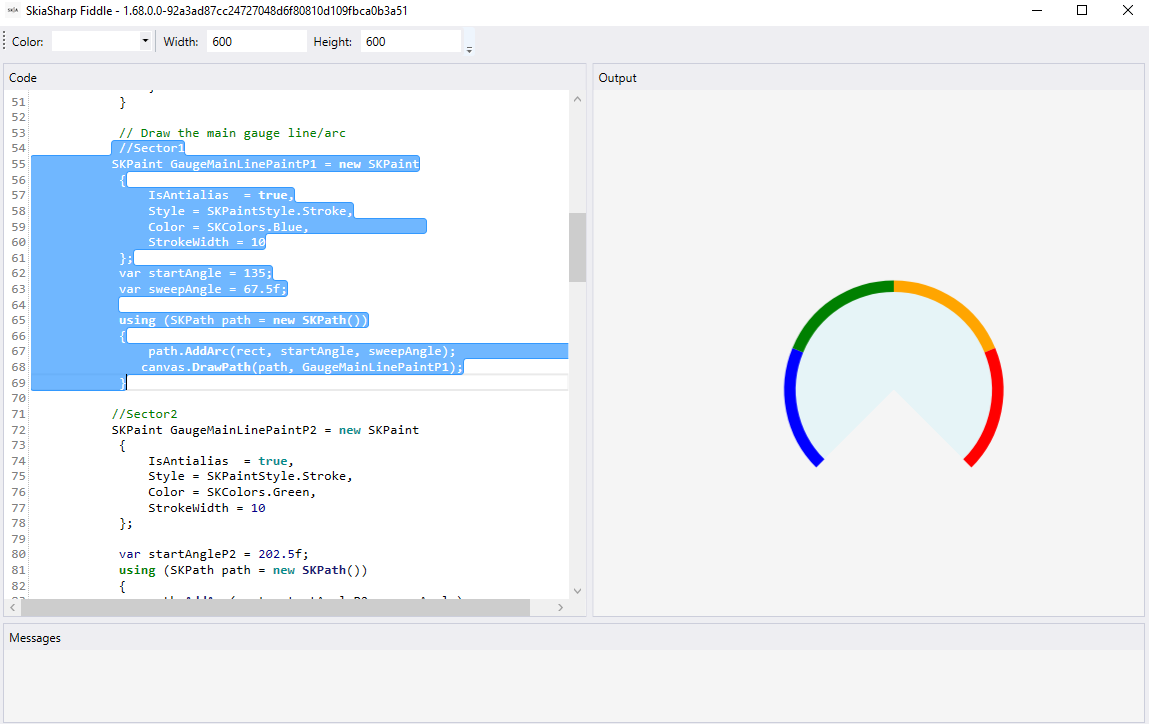
SkiaSharpFiddle
Please welcome the awesome tool created by Matthew Leibowitz called SkiaSharpFiddle. This tool is available for both Windows and Mac (an extension for VS for mac).

Let’s see how easy is to use this tool and save our time). Basically, we will add layer by layer to get the desired result. First let’s add a background and the main arc with different colors. To get different colors on the main arc I have used 4 different paths. Each color represents a separate velocity range.
//Blue sector
SKPaint GaugeMainLinePaintP1 = new SKPaint
            {
                IsAntialias  = true,
                Style = SKPaintStyle.Stroke,
                Color = SKColors.Blue,
                StrokeWidth = 10
            };
            var startAngle = 135;
            var sweepAngle = 67.5f;
            using (SKPath path = new SKPath())
            {
                path.AddArc(rect, startAngle, sweepAngle);
               canvas.DrawPath(path, GaugeMainLinePaintP1);
            }
Next let’s add a needle with a screw. The needle should come before screw. The screw is tuned with a nice radial gradient
 DrawNeedle(canvas, ValueToAngle(50));
//Draw Screw
 NeedleScrewPaint = new SKPaint()
  {
    IsAntialias = true,
    Shader = SKShader.CreateRadialGradient(center, width / 60, new SKColor[]
    { new SKColor(171, 171, 171), SKColors.White }, new float[] { 0.05f, 0.9f }, SKShaderTileMode.Mirror)};
    canvas.DrawCircle(center, width / 60, NeedleScrewPaint);
    SKPaint paint = new SKPaint
     {
       IsAntialias = true,
       Style = SKPaintStyle.Stroke,
       Color = new SKColor(81, 84, 89).WithAlpha(100), StrokeWidth = 1f
     };
       canvas.DrawCircle(center, width / 60, paint);

Also we need to add a label to show the current Value .
// Draw the Value on the display
  var valueText = 50.ToString("F1");
  float valueTextWidth = textPaint.MeasureText(valueText);
  textPaint.TextSize = 35f;
  textPaint.MeasureText(valueText, ref textBounds);
  xText = -1 * textBounds.MidX;
  yText = 85 - textBounds.Height;
  // And draw the text
  canvas.DrawText(valueText, xText, yText, textPaint);

As you can see we can easily tune our control and see changes in real time without running Visual Studio.
Animation
And last but not least:), let’s add some animation. Animating our needle is basically redrawing the gauge at various data intervals and finally stopping at the target value.
async Task AnimateProgress(int progress)
        {
            if (progress == GaugeControl.Value)
            {
                return;
            }
            if (progress <= GaugeControl.Value)
            {
                for (int i = (int)GaugeControl.Value; i >= progress; i--)
                {
                    GaugeControl.Value = i;
                    await Task.Delay(2);
                }
            }
            else
            {
                for (int i = (int)GaugeControl.Value; i <= progress; i++)
                {
                    GaugeControl.Value = i;
                    await Task.Delay(2);
                }
            }
        }
To demonstrate the animation I have added a timer and RND generator that generates new values every two seconds in the given range [0-100]
 _timer = new Timer()
   {
     Interval = 2000
   };
   //Trigger event every 2 seconds
   _timer.Elapsed += OnTimedEvent;
   _timer.Enabled = true;
////////////////////////////////
 private void OnTimedEvent(object sender, ElapsedEventArgs e)
   {
    Device.BeginInvokeOnMainThread(async() => await  AnimateProgress(RAND.Next(100)));
   }
Wrapping Up
As you can see SkiaSharpFiddle is a really huge time saver and allows us to tune controls easily and see changes in real time.
You can download the full sample source code here and the SkiaSharpFiddle sample file with the tuned control here.