ASP.NET Web Forms has been a cornerstone of a lot of enterprise web development for the last two decades. However, in 2019 Microsoft made it clear that all of their new development will focus on ASP.NET Core and modern .NET (formerly known as .NET Core), and that .NET Framework 4.8 will be the last major version.
Since Web Forms can only run on .NET Framework, and Microsoft has no plans to migrate it to modern versions of .NET, upgrading your Web Forms apps to something more modern is the only path forward for these applications long-term. For organizations still relying heavily on ASP.NET Web Forms, this presents a challenge:
“How Do You Transition a Large Web Forms Application Gradually Over Time?“
In this blog I’ll show why Blazor is a good option to migrate your Web Forms applications to. I’ll also show you how you can do this process gradually over time using a tool called YARP to implement something called the Strangler Fig pattern.
The Strangler Fig Pattern: A Gentle Transition
If your plan to migrate your Web Forms app is to do it all at once, then it is destined for failure. This approach is not very agile, and comes with a large risk of failure unless the application is very small.
A better, more Agile approach is something called the Strangler Fig Pattern. This pattern provides a proven approach for incremental modernization. Instead of rewriting your entire app from scratch, you can incrementally replace old parts of your system with new, modernized components.

For example, this pattern would allow you to continue running your existing ASP.NET Web Forms application while progressively replacing its features with new ones written in Blazor. All that time, you could use a facade layer to bring those two applications together into a single, coherent experience for your users. If you do it right, they will have no idea they are using two different applications.
For a more detailed exploration of the Strangler Fig Pattern, check out this post I wrote about it previously.
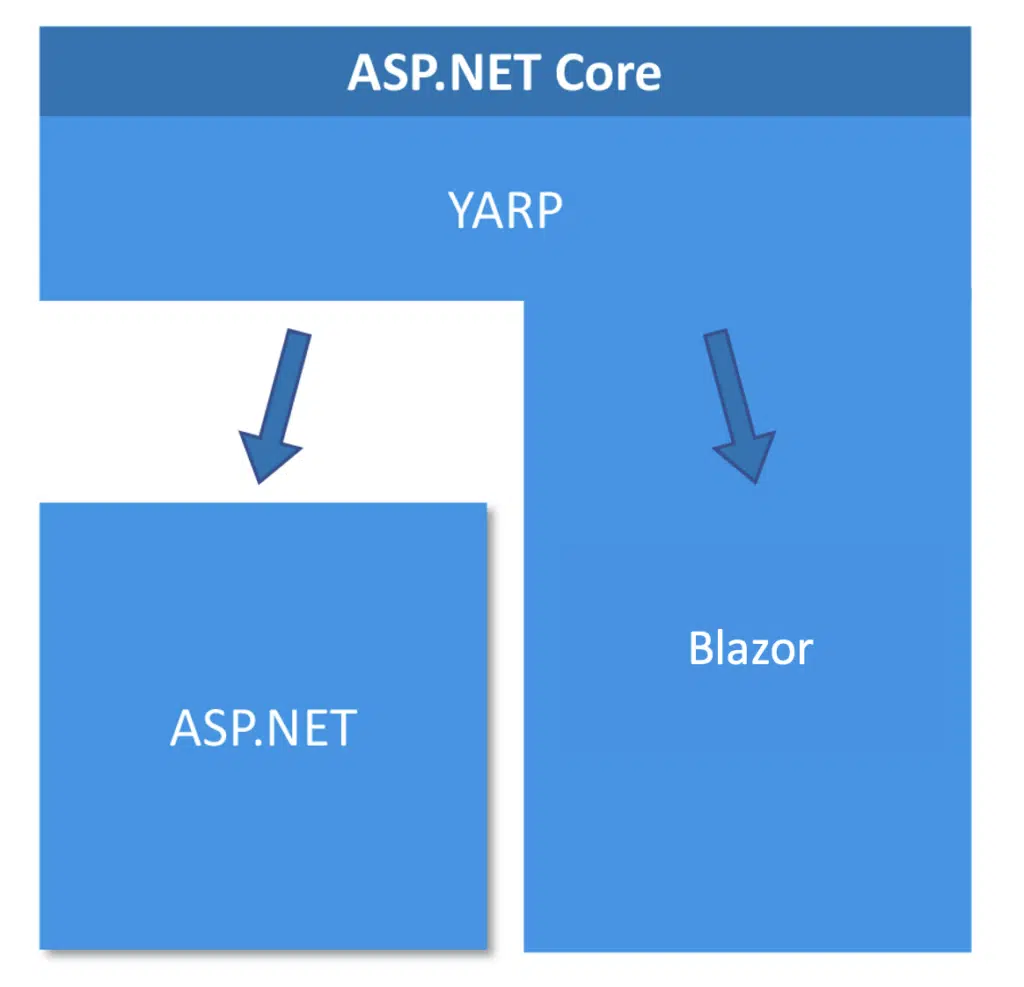
How YARP Makes Gradual Migration Possible
One of the biggest concerns with any system modernization is ensuring that both the old and new systems can coexist during the transition period. This is where YARP (Yet Another Reverse Proxy) comes into play. YARP allows you to implement the Strangler Fig pattern by either proxying incoming requests to your legacy Web Forms application, or handling them directly in your new Blazor-based app.
Using YARP, you can incrementally introduce Blazor WebAssembly (or other modern web technologies) into your project without doing a disruptive “all-at-one” rewrite—something that is rarely a good idea in Agile environments. Instead, you can continue to support critical business functions while progressively modernizing at your own pace.
YARP deploys as part of the pipeline of your modern application, either proxying requests through to the legacy application or handling them directly in the modern one. That means that, even though Strangler Fig includes three conceptual parts–the facade, legacy app, and modern app–you only need to deploy two things.
What is Blazor?
Blazor is Microsoft’s modern web framework that allows you to build interactive web applications using C# and .NET, rather than JavaScript. It supports two primary hosting models:
- Blazor WebAssembly (Wasm): Blazor WebAssembly takes advantage of a new assembly-like run-time in the browser that allows code compiled from many different languages to run at near-native speed on different processor architectures. Wasm apps run entirely on the client-side in the browser, offering a rich, responsive user experience. As a result, the initial download can be larger, and code can be decompiled, so secrets should not be kept in it. Typically, data in these apps is loaded through REST API calls.

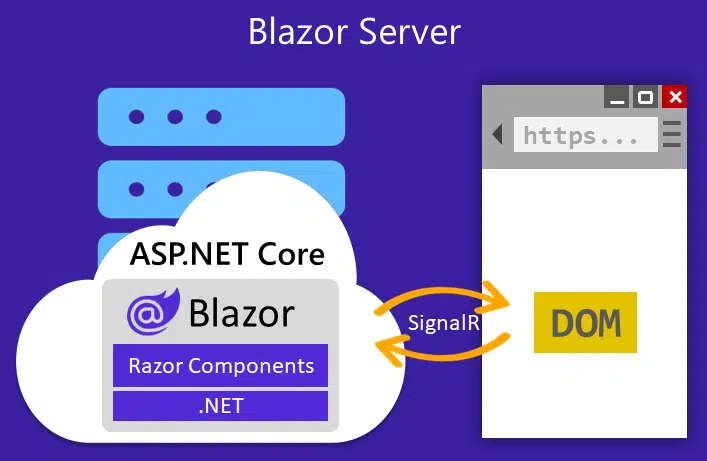
- Blazor Server: Blazor Server renders components on the server-side and sends just the updates to the client in real-time using WebSockets (via SignalR). The front-end automatically refreshes the DOM with the changes, resulting in more efficient data handling but requiring a constant connection with the server. These apps run completely on the server, making them more secure for secrets in your code, but putting more of the processing load on the server. Because your code runs on the server, you also get the benefit of being able to directly connect to resources like databases without the need for an API.
More recent versions of Blazor allow you to make this decision on a component-by-component or page-by-page basis, and you can also specify an automatic render mode where the component will load immediately as a server-side component while downloading the WebAssembly application in the background. On subsequent visits to that page, the app will run as a client-side WebAssembly app. This approach gives you the best of both worlds, but keep in mind, that these pages will also have to be written to be able to access data in both of these render modes.
Web Forms to Blazor: A Step-by-Step Guide
To demonstrate how this migration process can work, I created a sample project with an ASP.NET Web Forms project running on .NET Framework 4.8.1 and a Blazor app running on .NET 8. I’ve set them up with YARP to make them look and work together as if they were a single application.
Below are the general steps I took to accomplish this. Keep in mind, no two apps are the same, so your app’s needs might vary.
1. Add a Blazor app to the solution
Decide if you’d like a Blazor client or server app (or a mix) and select the appropriate options to match. For my example code, I selected a Blazor WebAssembly app.

2. Update the Blazor layout to match Web Forms
For this app, that meant taking what was in Site.Master in the Web Forms app and breaking it up into App.razor, NavMenu.razor, and MainLayout.Razor in the Blazor app.
Here is my new App.razor:
<!DOCTYPE html>

<html lang="en">
<head runat="server">
    <meta charset="utf-8" />
    <meta name="viewport" content="width=device-width, initial-scale=1.0" />
    <base href="/" />

    <link rel="stylesheet" href="bootstrap/bootstrap.min.css" />
    <link rel="stylesheet" href="/Content/css">
    <script src="/bundles/modernizr"></script>

    <link rel="stylesheet" href="app.css" />
    <link rel="stylesheet" href="BlazorApp.styles.css" />
    <title>My ASP.NET Application</title>
    <link rel="stylesheet" href="/Content/css">
    <link href="/favicon.ico" rel="shortcut icon" type="image/x-icon" />
    <HeadOutlet />
</head>
<body>
   <Routes />
    <script src="_framework/blazor.web.js"></script>
    <script>"/bundles/jquery"</script>
    <script>"/bundles/bootstrap"</script>
</body>
</html>
And here is my new MainLayout.razor:
@inherits LayoutComponentBase
<div class="page">
<nav class="navbar navbar-expand-sm navbar-toggleable-sm navbar-dark bg-dark">
<NavMenu />
</nav>
<div class="container body-content">
@Body
<hr />
<footer>
<p>© 2024 - My ASP.NET Application</p>
</footer>
</div>
</div>
<div id="blazor-error-ui">
An unhandled error has occurred.
<a href="" class="reload">Reload</a>
<a class="dismiss">X</a>
</div>And finally, here is my new NavMenu.razor:
<div class="container">
    <a class="navbar-brand" runat="server" href="/">Application name</a>
    <button type="button" class="navbar-toggler" data-bs-toggle="collapse" data-bs-target=".navbar-collapse" title="Toggle navigation" aria-controls="navbarSupportedContent"
            aria-expanded="false" aria-label="Toggle navigation">
        <span class="navbar-toggler-icon"></span>
    </button>
    <div class="collapse navbar-collapse d-sm-inline-flex justify-content-between">
        <ul class="navbar-nav flex-grow-1">
            <li class="nav-item"><a class="nav-link" href="/">Home</a></li>
            <li class="nav-item"><a class="nav-link" href="/About">About</a></li>
        </ul>
    </div>
</div>
3. Add the missing CSS to Blazor
I copied the Content and Scripts folders from Web Forms into the BlazorApp project and updated the BlazorApp.csproj file to remove the many lines it adds with this simple wildcard syntax:
<ItemGroup>
    <Content Include="Content\**\*.*">
        <CopyToOutputDirectory>PreserveNewest</CopyToOutputDirectory>
    </Content>
    <Content Include="Scripts\**\*.*">
        <CopyToOutputDirectory>PreserveNewest</CopyToOutputDirectory>
    </Content>
</ItemGroup>
Next I added the LigerShark.WebOptimizer.Core to the BlazorApp project to help recreate the CSS and JS bundles that existed in the Web Forms app. ASP.NET Core has gotten rid of the concept of bundles, so this is just a simple way to temporarily add them back until I can migrate these files into a more modern bundling technology.
dotnet add package LigerShark.WebOptimizer.CoreFinally, I can update the Program.cs in the BlazorApp project to use LigerShark to recreate the same bundles I had in the legacy Web Forms app.
builder.Services.AddWebOptimizer(pipeline => {
    pipeline.AddJavaScriptBundle("/bundles/jquery",
        "Scripts/jquery-3.3.1.js").UseContentRoot();

    pipeline.AddJavaScriptBundle("/bundles/jqueryval",
        "Scripts/jquery.validate.*").UseContentRoot();

    pipeline.AddJavaScriptBundle("/bundles/modernizr",
        "Scripts/modernizr-*").UseContentRoot();

    pipeline.AddJavaScriptBundle("/bundles/bootstrap",
        "Scripts/bootstrap.js",
        "Scripts/respond.js").UseContentRoot();

    pipeline.AddCssBundle("/Content/css",
        "Content/bootstrap.css",
        "Content/custom.css",
        "Content/base.css",
        "Content/site.css").UseContentRoot();
});
Now, if I run just the Blazor app, it should look just like my old Web Forms app used to look. If not, fix up any issues you run into. For me, I had to remove some CSS from the default Blazor app that was contradicting my CSS copied from the legacy Web Forms app.
4. Add YARP to the Blazor project
Now that the Blazor app looks just like the legacy Web Forms app, let’s bring the two together using YARP. To start, add the Yarp.ReverseProxy nuget package to your Blazor project.
dotnet add package Yarp.ReverseProxyIn the Blazor app’s Program.cs file, we’ll set up YARP with the following line:
builder.Services.AddHttpForwarder();5. Update the navigation header
To make both apps have the same navigation options in their headers, I update the NavMenu.razor in the Blazor app to:
<li class="nav-item"><a class="nav-link" href="/">Home</a></li>
<li class="nav-item"><a class="nav-link" href="/About">About</a></li>
<li class="nav-item"><a class="nav-link" href="/Contact">Contact</a></li>
<li class="nav-item"><a class="nav-link" href="/Weather">Weather</a></li>
<li class="nav-item"><a class="nav-link" href="/Counter">Counter</a></li>
And I update the Web Forms app’s Site.Master to match:
<li class="nav-item"><a class="nav-link" runat="server" href="/">Home</a></li>
<li class="nav-item"><a class="nav-link" runat="server" href="/About">About</a></li>
<li class="nav-item"><a class="nav-link" runat="server" href="/Contact">Contact</a></li>
<li class="nav-item"><a class="nav-link" runat="server" href="/Weather">Weather</a></li>
<li class="nav-item"><a class="nav-link" runat="server" href="/Counter">Counter</a></li>
6. Configure YARP routes
Finally, we’ll set up the specific YARP forwarding rules we want. For me that meant forwarding every request for something in the /Scripts, /Content, or /Bundles paths, plus the /About and /Contact routes that only exist in my legacy Web Form application.
app.MapForwarder("/Scripts/{**catchAll}", app.Configuration["ProxyTo"]).Add(static builder => ((RouteEndpointBuilder)builder).Order = 1);

app.MapForwarder("/Content/{**catchAll}", app.Configuration["ProxyTo"]).Add(static builder => ((RouteEndpointBuilder)builder).Order = 2);

app.MapForwarder("/bundles/{**catchAll}", app.Configuration["ProxyTo"]).Add(static builder => ((RouteEndpointBuilder)builder).Order = 3);

app.MapForwarder("/About", app.Configuration["ProxyTo"]).Add(static builder => ((RouteEndpointBuilder)builder).Order = 4);

app.MapForwarder("/Contact", app.Configuration["ProxyTo"]).Add(static builder => ((RouteEndpointBuilder)builder).Order = 5);
Because these are all looking up a ProxyTo setting, I’ll add that to the “environmentVariables” section of my launchSettings.json file. I’ll use localhost and the port configured in the Web Form’s projects startup settings. NOTE: eventually, I’d want to put this setting onto my server using either an environment variable, AppSettings.json setting, or whatever method you use for configuring your applications.
"environmentVariables": {
  "ASPNETCORE_ENVIRONMENT": "Development",
  "ProxyTo": "https://localhost:44355/"
}
7. Change Startup Settings
I want both apps to start together so the Blazor app can proxy requests through to the Web Forms app for the endpoints I configured with YARP. To do this right-click on the solution and select Configure Startup Projects…
Set both the WebForms and BlazorApp projects to startup, with the WebForms first.

Right-click on the Web Forms project and pick Properties. Select Web and choose the option “Don’t open a page. Wait for a request from an external application.” This will keep the Web Forms app form opening up in a browser directly.

Results
You should now be able to start the debugger and navigate between your Blazor app and Web Forms app seamlessly. I put the app that generated each page in parenthesis in the headers of each page so you can see which ones are from WebForms and which are from Blazor.


Other Migration Scenarios
While migrating Web Forms to Blazor is the scenario I’ve covered in this blog post, it’s far from the only one YARP can help with. In fact, YARP can help you migrate virtually any web technology that communicates via HTTP to a modern .NET web platform.
For instance, you can gradually upgrade an ASP.NET Web API project to ASP.NET Core Web API, or even move old MVC apps to Razor Pages or Blazor. Beyond .NET, you could even transition from a non-.NET platforms, such as Node.js or PHP applications, to a modern .NET services by using YARP.
More Reading
If you’d like to make it so these two applications can share things on the backend such as session state and authentication, you will want to look into the System.Web Adapters.
Download the Code
All the demo code from the blog can be found in a sample app I built and shared on Trailhead’s GitHub.
Conclusion
Modernizing a legacy ASP.NET Web Forms app to a Blazor WebAssembly solution doesn’t have to be a painful, disruptive process. By leveraging YARP to implement the Strangler Fig Pattern for a gradual, side-by-side migration, you can transition at your own pace. This approach ensures that you’re delivering value to your users throughout the process while incrementally modernizing your tech stack for the future.
Ready to modernize your Web Forms applications? Reach out to Trailhead for a consultation, and let’s build a roadmap for your transition to Blazor.