In this blog article, I will show you how I split my development environment for a single application between macOS and a Parallels virtual machine (VM) running Windows. But, before we jump into it, I want to elaborate briefly on what my motivation was for doing this.
Why a Split Dev Environment
Recently, our company achieved a significant milestone by successfully dividing a monolith API (.NET Framework 4.8 and .NET Core) into two distinct projects, eliminating any shared build dependencies. This strategic move, aimed at improving efficiency, also enabled me to make a significant change to the setup of my development environment.
Previously, my development environment relied on Windows ARM running on Parallels on my ARM-based Mac. Even with the database hosted in the cloud, this led to a substantial 20 GB+ RAM consumption. Any .NET Framework application only runs natively on Windows, but the more of the application I could get out of the VM and running directly on macOS, the more memory efficient it would be. For that reason, I decided to move just the .NET Core API and React front-end directly to macOS and only use the Windows VM on Parallels for hosting and debugging the legacy .NET Framework API. This setup enabled me to reclaim 7GB of RAM with similar performance.
It was not trivial to set this up, so in this short article, I am going to show you how to set up your dev environment so that you can connect from macOS to the Windows IIS web server running on a VM. For the sake of keeping it short, I am going to assume you have your VM and IIS website ready to go.
Parallels Default Networking Mode
When you configure a new Parallels VM, the network settings will default to Shared Network. What that means is that Parallels will set up a new network for your VM and enable all communication.
Unfortunately, you do not have any control over the addressing scheme for that network. The goal here is to assign a static IP address and although in theory, you could do that, but if Parallels somehow changed the network address your VM would lose all the network connectivity. That is why you are better off changing the network type to ‘Bridged’. With this, you’ll end up with your host and VM both getting an IP from the DHCP server on your physical network (most likely 192.168.***.***).

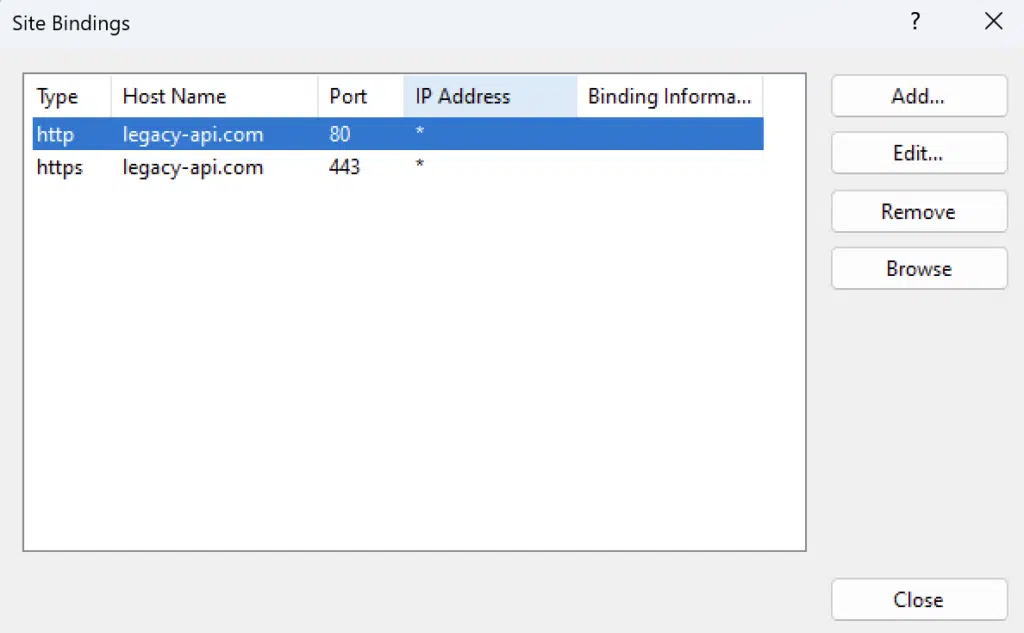
IIS Site Configuration
Because you will never be able to access your VM by localhost, you need to edit the binding of your website to a domain name of your choosing. Later we will configure macOS to translate the custom domain name into the IP of your VM.
Windows Configuration
On the Windows VM, you need to enable web traffic into your VM by adding a firewall rule for ports 80 and 443.
macOS Configuration
Now we need to allow the macOS to translate the custom domain into an IP address of your VM:
- Open the Terminal app
- Navigate to /private/etc
- Open the hosts file by typing sudo vim hosts
- Enter the insert mode by typing i
- Add the [ip] [domain] (e.g. 192.168.1.100 legacy-api.com)
- Click the ESC key and type :wq to save changes
Now when you try to access legacy-api.com on this computer, it will map to the IP address of your VM.
Configure Your Front-End App
Depending on your environment configuration (whether your frontend app connects only to a legacy API or to both new and legacy) you may need to add a script in your package.json and a corresponding environment file that contains the valid URLs for your legacy API.
Final Thoughts
Unless one day Apple decides to create a macOS subsystem for Windows, allowing you to run Windows docker images on macOS, we are bound to run legacy solutions on a Windows VM. Fortunately thanks to Parallels Bridged Networking mode and a little bit of configuration, we can easily offload our legacy .NET Framework API to a VM and still access it from a front-end running in macOS.