Web components are custom, reusable HTML, CSS, & JS elements with their own complex behavior which is encapsulated away from the rest of the code and can be used independently in web apps. We can create and compile web components in many ways – by Angular project, with pure JavaScript, another frameworks etc. Web components can communicate with the rest of a webpage’s code: receiving input most commonly through custom HTML attributes and providing results most commonly by emitting custom events (but there are also several less common ways of communications as well). You can use a web component simply by adding its JS file to a webpage and initializing the web component on that page using its custom HTML tag.
Code example:
<html>
  <head>
  <meta charset="UTF-8">
    <title>Example page</title>
  </head>
  <body>
    <div>
      <custom-element-tag></custom-element-tag>
    </div>
    <script src="path/to/static/js/files/custom-element.js"></script>
  </body>
</html>
Use Case in Real Life
Using web components is very handy when, for example, you need to create some complex UI-component nested within a server-side rendering framework. For example, consider the following:
- A legacy enterprise project built with Laravel on PHP (or it could be Django or C# on .NET Framework or anything)
- A part of application’s dashboard has already been replaced with an Angular SPA
- We need to implement a reactive-like multi-page form with in-flight validation, API calls, file uploading and simple state management. It will be a part of that server side rendered dashboard
- We need to keep the UI view and navigation consistent
For this situation, a web component is a great option. We can even create it as a part of an existing Angular SPA and export it as a static JS file to host it in the main server side project.
This allows:
- Creating and testing the element “in the wild” as part of Angular project
- The ability to use all the built-in functionality of Angular – reactive forms, HTTP-modules, data-management
- Re-use of our styles, I18 files etc.
- Reduced time and complexity of development itself
- Keeping the same technology stack as the rest of the project
Steps to Create and Compile Web Components in Angular Project
The general steps to implement this solution are relatively simple:
- Follow your normal process of development for the required module inside your Angular project and test it there (as a part of a test page or as a separate page)
- Build it as a standalone part to a single-file bundle
- Move the bundle to the server side project’s assets folder
- Maintain two builds–the full Angular SPA as well as a separate build process for the web component bundle.
Another simple solution is to make a separate Angular project with the required web components and proper configs, its own build, and to compile several JS-files and import them to the server side project. This can work better without impact your main Angular project but it obviously requires additional manual steps to complete the build, maintaining two projects simultaneously and dublicating styles, translations etc.
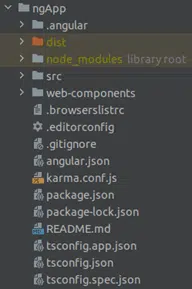
Re-Organize Folder Structure of Current Angular Project
Add folder with a name such as web-components, for example. We will use this folder for compilation of our Web Components.
The inner structure of the folder can look something like this:
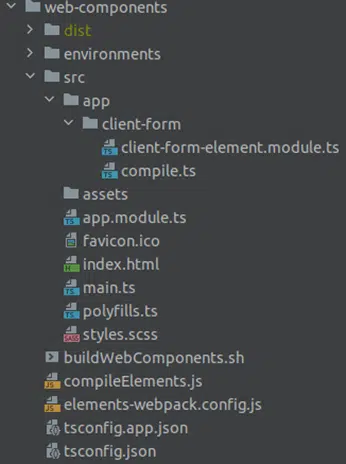
As you can see, we duplicate the files tsconfig.json and tsconfig.app.json from the root folder of the Angular SPA along with root files from /src folder: index.html, main.ts, and polyfills.ts. The build process will use these files to compile Web Components as an independent Angular project but inside the main project.
Now we can create folders for particular web components’ modules. For example, we can use the name ‘client-form’ to represent a future web component for the client form. It should contain basically two files—the native Angular module to compile the web component and a compile.ts file, which plays the same role as the main.ts file does for whole project.
Here’s a code example for client-form-element.module:
import {ClientFormModule} from "../../../../src/app/client-form-module/client-form.module";
import {ClientFormComponent} from "../../../../src/app/client-form-module/client-form-component/client-form.component";

@NgModule({
  imports: [BrowserModule, ClientFormModule],
  entryComponents: [ClientFormComponent],
})
export class ClientFormElementModule {
  constructor(injector: Injector) {
    const ngElement = createCustomElement(ClientFormComponent, {
      injector,
    });

    customElements.define('custom-client-form', ngElement);
  }

  ngDoBootstrap() {}
}
The module creates a web component from the regular build, tests the Angular component, and registers it as a web component itself with the custom HTML-tag ‘custom-client-form’:
const ngElement = createCustomElement(ClientFormComponent, {
      injector,
    });

customElements.define('custom-client-form', ngElement);
Take a note that the module imports Angular component and module from the main Angular SPA:
import {ClientFormModule} from "../../../../src/app/client-form-module/client-form.module";
import {ClientFormComponent} from "../../../../src/app/client-form-module/client-form-component/client-form.component";
Compile.ts looks like regular main.ts file:
import {enableProdMode} from '@angular/core';
import {platformBrowserDynamic} from '@angular/platform-browser-dynamic';
import {ClientFormElementModule} from "./client-form-element.module";

enableProdMode();

platformBrowserDynamic()
  .bootstrapModule(ClientFormElementModule)
  .catch(err => console.error(err));
Create Build Process to Compile Web Components
There are two files in root web-components folder – compileElements.js and buildWebComponents.sh.
We can execute the file named buildWebComponents.sh with a package.json script. It contains a script to reset the dist folder, create a custom folder for new Web Components’ bundles, and start the compilation process using compileElements.js.
#!/bin/sh

rm -r -f dist/ &&
mkdir -p dist/components &&
node compileElements.js
The compileElements.js file is responsible for direct compilation of all web components from web-components folder. Hence it reads a list of folders that should be compiled and starts the process for every component one-by-one. Note that the scripts use the folder name for naming of output file (but it’s up to you to change this approach if you’d like).
const fs = require('fs');
const {execSync} = require('child_process');

// reads all components’ names from a app folder:
const components = fs.readdirSync(`src/app`);

// compile all components one by one :
components.forEach(component => compileComponent(component));

function compileComponent(component) {
  // script to build particular web-component from Angular component:
  const buildJsFiles = `ng build web-components --configuration production –main=web-components/src/app/${component}/compile.ts`;

  // script to concat all built js bundles in to one file with given name:
  const bundleIntoSingleFile = `cat ./dist/tmp/runtime.js ./dist/tmp/polyfills.js ./dist/tmp/main.js > ./dist/tmp/custom-${component}.js`;

  // script to copy concatenated js-file to SSR static folder:
  const copyBundledComponent = `cp ./dist/tmp/custom-${component}.js ../../static/js/`;

  // script to copy file with styles to SSR static folder (if needed of course):
  const copyCss = `cp ./dist/tmp/styles.css ../../static/css/`;

  // all mentioned scripts’ execution
  execSync(`${buildJsFiles} && ${bundleIntoSingleFile} && ${copyBundledComponent} && ${copyCss}`);
}
Configure Custom Webpack Builder
During a regular compilation in Angular SPA, Webpack patches the window object to help prevent duplicating of modules. It therefore add a specific function to window.webpackJsonp, but only to the first added component. Other chunks of code just call that function with the list of modules that should be started. So we need to define unique function, or rather unique place for that function for every component.
You can solve this issue by custom webpack builder, e.g.:
- Add custom webpack to main Angular SPA
ng add @angular-builders/custom-webpack –project=elements- Create configuration for custom webpack and place it in the root web-components folder nearby with compileElements.js file
const uuid = require('uuid');

module.exports = {
  output: {
	// this will help to create unique name of loader function
    chunkLoadingGlobal: 'wcsElements-' + uuid.v1(),
    library: 'elements',
  },
};- Add configuration to angular.json file (see below)
Configure angular.json for Web Components Inside Angular Project
We can use the build script in compileElements.js that points out to project name with is not previously defined in angular.json file:
const buildJsFiles = `ng build web-components --configuration production –main=web-components/src/app/${component}/compile.ts`;This allows us to separate builders and configurations as well as sources files etc. from the main project and build them independently. So let’s configure the project for web-components in angular.json file properly.
- Add a project for web-components alongside the existing, main Angular project
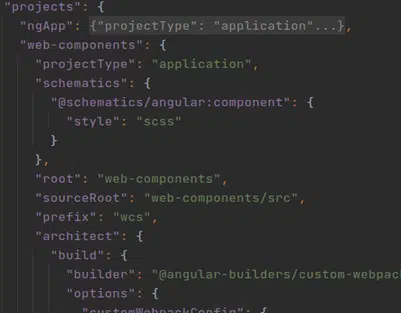
- Several configurations and paths should be adjusted to the existing folder structure. Take note, we use custom webpack mentioned above as a builder for this project (“builder”: “@angular-builders/custom-webpack:browser”)
"projectType": "application",
  "schematics": {
    "@schematics/angular:component": {
      "style": "scss"
    }
  },
  "root": "web-components",
  "sourceRoot": "web-components/src",
  "prefix": "wcs",
  "architect": {
    "build": {
      "builder": "@angular-builders/custom-webpack:browser",
      "options": {
        "customWebpackConfig": {
          "path": "./web-components/elements-webpack.config.js"
        },
        "outputPath": "web-components/dist/tmp",
        "baseHref": "",
        "index": "web-components/src/index.html",
        "main": "web-components/src/main.ts",
        "polyfills": "web-components/src/polyfills.ts",
        "tsConfig": "web-components/tsconfig.app.json",
        "inlineStyleLanguage": "scss",
        "assets": [
          "web-components/src/assets"
        ],
        "styles": [
          "./node_modules/@angular/material/prebuilt-themes/deeppurple-amber.css",
          "web-components/src/styles.scss"
        ],
        "scripts": []
      },
/// Other code identical to the main project
Define Start Script in package.json File
Start script can look like this:
"build:elements": "cd web-components && sh buildWebComponents.sh",We can start it not only separately but also combine with a script that builds the whole Angular SPA—it depends on your deployment or CI/CD requirements.
  "scripts": {
    "ng": "ng",
    "start": "ng serve",
    "build": "ng build ngApp --configuration production",
    "build:elements": "cd web-components && sh buildWebComponents.sh",
    "watch": "ng build --watch --configuration development",
    "test": "ng test"
  },
Conclusion
The solution I’ve described above creates and separately compiles web components in your Angular project, and as you can see, it is quite easy to implement. Further, it is scalable and leverages some of the powerful benefits of the Angular framework itself.
The particular folder structure you use depends on the existing architecture and requirements of your particular project. It would be a simple change to adjust any of the paths or names mentioned above to suit your needs.